Desert Online General Trading LLC
Dubai, United Arab Emirates
Desert Online General Trading LLC
Dubai, United Arab Emirates


🚀 Elevate your IoT game with the all-in-one NodeMCU OLED powerhouse!
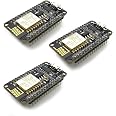
The NodeMCU ESP8266 Development Board combines a powerful ESP-12E WiFi module with a crisp 0.96-inch OLED display, all in a compact form factor. Featuring a 32-bit Tensilica processor running up to 160 MHz, 128 KB RAM, and 4MB flash memory, it supports Arduino IDE and MicroPython programming. Pre-soldered pin headers and Micro USB connectivity with CH340 driver make setup effortless, ideal for professional-grade IoT projects like weather stations, smart clocks, and network monitors.


| Processor | core_m_family |
| RAM | LPDDR3 |
| Wireless Type | Bluetooth |
| Brand | ideaspark |
| Series | NodeMCU |
| Operating System | FreeRTOS |
| Item Weight | 0.634 ounces |
| Product Dimensions | 2.24 x 1.22 x 0.51 inches |
| Item Dimensions LxWxH | 2.24 x 1.22 x 0.51 inches |
| Color | ESP8266 0.96 Inch OLED Board |
| Number of Processors | 1 |
| Manufacturer | ideaspark |
| ASIN | B0BVM3H46B |
| Date First Available | March 18, 2023 |
M**T
Works great, screen was better than I thought it would be
Device and screen work . It is built well and the built-in OLED is particularly helpful for my use case would definitely buy this again if I didn’t need ESP 32
C**R
A Great Buy & Works On All My Projects
The media could not be loaded. Works great with all my codes
J**H
OLED Works when you have the right code!
So first off. the oled has two colors, the top 1/4 is yellow and the bottom 3/4 blue. don't know why...Correct Arduino code for the OLED to work!U8G2_SSD1306_128X64_NONAME_F_HW_I2C u8g2(U8G2_R0, /* reset=*/ U8X8_PIN_NONE, /* clock=*/ 14, /* data=*/ 12);is the correct line for the OLED! some online forums show the incorrect way.U8G2_SSD1306_128X64_NONAME_F_HW_I2C u8g2(U8G2_R0, 14, 12, U8X8_PIN_NONE);
M**H
It’s amazing!!!!
It was awesome I plugged this in and then booted it up and a magic genie appeared and granted me three wishes. The first wish was for infinity of these and then they fell out of the sky and hit me on the head and I actually died so I can’t make the rest of the wishes and I don’t really know how I’m typing this right now. It’s almost as if I’m still alive but I’m not it’s a very strange situation.
M**T
No documentation
I have a setup using an ESP8266 (without the display) and added a .96" oled display to that. Worked flawlessly for a couple of years, so I thought I would clean it up a little and try this with the display built in.When receiving this, the oled displayed the data shown in the main page, so I know it works for that. The display is not straight with the board, skewed just enough to drive you crazy.The only documentation here is "look at picture 4 and 5" which is an incomplete sketch. Running 3 different utilities to determine the address of the oled results in "no addresses found", and running my original sketch compiles, loads, but doesn't work.The libraries shown in "picture 4 and 5" are loaded, but nothing about addressing the oled.I have a couple of weeks to return it, and it's looking like that's the route to take.
H**O
It works, convenient display on board - don't use Adafruit GFX, SSD1306 libs
Follow the example on the pictures, that's really all the documentation you'll get but it works. I tried using the more widely known Adafruit's libraries for these type of displays via I2C but the address is not found and it won't work (0x3C). The suggested library (u8g2) works as it defines the clock and data pins. I would buy again just for the convenience of not having to deal with 4 extra pins and cables.
S**D
Works great, follow the instructions
I was lost at first because there were no instructions included with the product, but the info in the product images was perfect and easy to follow. Works great and a good price.
P**A
Great board works well
The esp8266 is great. I was able to get it loading examples pretty easily following the instructions. It was a little challenging to get the display to work due of lack of documentation. Using the Arduino IDE and the U8G2 library with the following works: U8G2_SSD1306_128X64_NONAME_F_SW_I2C u8g2(U8G2_R0, /* clock=*/ 14, /* data=*/ 12, /* reset=*/ U8X8_PIN_NONE); Use any of the u8g2 examples. Of course had to put two breadboards together, breaking off one power side strip to breadboard it, but that was expected.
TrustPilot
vor 4 Tagen
vor 2 Wochen