💨 Quiet power that keeps your space fresh and your vibe flawless.
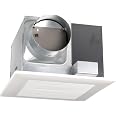
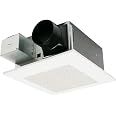
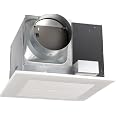
The Panasonic FV-20VQ3 WhisperCeiling Spot Ventilation Fan combines whisper-quiet operation at 1.3 sones with a robust 190 CFM airflow, all while maintaining energy efficiency with its Energy Star certification. Built with durable galvanized steel and a permanently lubricated motor, it promises long-lasting performance. Designed for easy installation and equipped with a backdraft damper, this fan is the perfect upgrade for any modern bathroom seeking silent, effective ventilation.
| Brand | Panasonic |
| Color | White |
| Electric fan design | Blower |
| Power Source | Corded Electric |
| Style | 190 CFM |
| Product Dimensions | 15"D x 15"W x 10.16"H |
| Room Type | Garage, Laundry Rooms, Bathroom, Living Room |
| Special Feature | Manual |
| Recommended Uses For Product | Exhausting, Ventilating |
| Noise Level | 51 dB |
| Wattage | 42 |
| Finish Type | White Or Cream |
| Air Flow Capacity | 190 Cubic Feet Per Minute |
| Blade Length | 24 Inches |
| Voltage | 120 Volts |
| Switch Type | airflow selector switch |
| Item Weight | 7.3 Kilograms |
| Included Components | Energy Star Bathroom Fan |
| Indoor/Outdoor Usage | Indoor |
| Model Name | 1.3-Sone 190 CFM |
| Control Method | App |
| Blade Material | Plastic |
| Efficiency | 4.6 CFM/W |
| Is Cordless? | No |
| Number of Power Levels | 1 |
| Manufacturer | Panasonic |
| UPC | 092281134499 132017569727 |
| Global Trade Identification Number | 00092281134499 |
| Size | 190 CFM |
| Part Number | FV-20VQ3 |
| Item Weight | 16.06 pounds |
| Country of Origin | China |
| Item model number | FV-20VQ3 |
| Is Discontinued By Manufacturer | No |
| Finish | White Or Cream |
| Item Package Quantity | 1 |
| Special Features | Manual |
| Batteries Included? | No |
| Batteries Required? | No |
| Warranty Description | ALL Parts: For period of 3 years (36 months) from the date of the original purchase. DC Motor: For period of 6 years (72 months) from the date of the original purchase. |
D**N
Great exhaust fan
Very quiet and very powerful. The particular fan I purchased was a 190 CFM for an eight foot by nine foot hall bath. I could have gone smaller (And if I was buying the fan again I would go smaller without any worries, maybe 130-150 CFM) but wanted to make sure it would remove the humidity, and boy does it. It’s winter right now and when you stand near the door you can feel air moving past you to the fan. I think in the summer that will be great, but right now it makes the bathroom a little cool.Installing it was easy enough, just know you’re not going to just throw this in ez peasy. You need attic access and your old four inch exhaust will need to be enlarged. Plan some possible minor carpentry work. You need to attach the fan at least on one side to a ceiling joist or a 2x4 tied to a ceiling joist. Compared to an average market house fan this is considerably heavier. Lots quieter but heavier. Overall this is a great fan.
J**H
Quiet
So I didn't realize this wasn't the type the comes with the EZ frame for retrofit which wasn't a big deal. This thing is super quiet and I get no steam in my bathroom now. Weak a nice 3m respirator disposable mask when your in the attic.STUFF TO INSTALL FAN3m respirator mask,Tape measure, marker, vibrating multitool or razor knife to remove the drywall in ceiling, wire nuts or wago wire connectors (this is what I used), wire stripper pliers, philips screw driver (screw impact with extension works better), screws to attach fan to the wood (2" long) screw to attach wood to joist (3" long or more depending on your situation) wood to screw fan to, caulk.STUFF TO INSTALL ROOF VENTHammer, Roof vent, flat bar, ladder, tape measure, Swiss snips to cut the shing(if you have the extra cash), hook razor blade for cutting shingle, 1 1/4" roofing nails to attach vent(only nail the vent where the shingle will cover them, ignore the holes at the bottom for nails) 2 tubes of roofing tar and caulk gun. You can use a pc of the shingle you cut to smooth the tar out, rubber gloves, 6" hole saw and drill or some other tool you have that can cut a hole on the roof. Magic marker or chalk to layout you cut area.STUFF TO INSTALL 6" HARD PIPEAluminum tape, the snips you bought earlier or grinder with cut off wheel. Marker, tape measure, self tapping sheet metal screws, driver for the screws.TO INSTALLthe flange of the fan has to be level with the top of the ceiling drywall since the electrical box comes all the way down to the back of the flange. I used the cardboard pattern to cut a hole in the ceiling right next to a joist. Then I took the 6" outlet /electrical box off the side by removing the two screws inside the fan housing securing it. I slid the fan in the hole and traced the outside flange with a marker. I then used a vibrating multitool to cut the remaining drywall out. Doing this allows you to screw the one side directly into the joist. Remove any drywall screws you may come across.On the other side you just have to measure from the other joist to the edge of the hole then add 7/8 of an inch for the flange width of the fan. This measurement is the width of the board you need to screw to the other joist so you can screw the other side of your fan into it. In my case I needed 1 1/4" thick board so I stacked two 1 x 3 boards togeather and screwed them to the joist. Wood is always smaller than the actual size so they were actually 5/8 and by stacking them it gave me the 1 1/4" I needed. I took my tape measure to the home store to make sure it was the right measurement. Even if I could only get 1 inch it would have been enough since you can just run the screws at an angle.Once its mounted you connect your two ground wires to the ground, black to black and white to white. Use a 3/8" clamp connector in the knockout of the electric box to hold to wire from moving and getting cut by the sheet metal. attach the 6" outlet / electric box panel and install the two screws used to keep it secure.Next step is figuring out how to vent it, I used a roof vent I got off amazon and watched some videos on how to install it then I got two adjustable elbows and some straight pipe so my vent is hard piped outside which works better than acordian tubing. Then I used self taping screws to secure the vent pipe to the fan and to the roof vent. I then covered every seam with the aluminum tape so it didnt leak. In the bathroof I used caulk (interior/exterior osi) to fill in the small gap between the fan and the drywall so nothing from the attic can get through the crack.
W**.
Move some air, hard install unless your a carpenter.
Okay, so, after allot of research and more research I finally broke my bank and got one of these! I'm getting ready to add blown atic cat insulation so I'm trying to upgrade everything that needs to be done in the attic as there is no going up there after this!I have a small house, 900 square feet with two bed and two bath, the one in the master is small with stand up shower, and the other is nice site about 13 x 16. I want to move some air through my house to reduce the heat bill. I also added radiate barrier in attic, and going to be adding to fans with my existing solar fan to move more air through my attic and R39 or more insulation. I also have solar, so I'm doing everything to try to stay energy efficient.I spent 2 days working on adding one of these in the smaller mast bath, what a job! I found it came with brackets, so I created a frame working backwords doing calculations to figure out the height it would push into my attic:1/2" Ceiling Sheet Rock3.5" Joist= 4" then the height of the vent/van was around 8"1/8" leaving around 4" above my current joist.So I did all this work in creating a frame and did a pretty good job with slicing some 2x4s down to hit the top backside of the sheet rock to screw into, and had to play some with getting into a tight space with the electrical lines and forced air/heat duck right there, used my sawzall to cut out for the elbow that comes of the massive size 6" outlet, then added a small adapter, with flex tube and connector to the roof with a vent from lowes.WOW, I learned a few things, I see there are easier ways, especially finding out later you can slide off the front part of the 6"dia vent outlet and wiring box and slide it up without cutting away the sheet rock, opps! Directions didn't state this as its only showing for new construction.After getting this all right so I can add the 4 L shaped brackets, you cant get to them and screw them in because they fit is so tight and the make it with the screws down away from the top instead of at the top, I should have flipped then and did a different frame but the brackets are curved at the ends so you would think to build it this way. I should have instead of bringing up my additional frame at the top of the unit housing… me bad, I could only get to two of the brackets by drilling into the frame with a slot to get in and screw them down, this is also not in direction, the brackets of for extending off something with its rubber washers etc.Live and learn on this one, but I was in a hurry and just wanted to get it done, should have planned it out better, will do better for the second one.One big issues is the wire box that you have to shut from the top of the attic, it has a cover that goes back on that has NO clearance between the back and the flange that goes around the front site where the cover goes on that also screws up into the sheet rock then joist, its like for 1/4" sheet rock, not ceiling typical 1/2", then you have to tighten the LITTLE screw back for the cover that faces towards and under the huge 6" tube with not much clearance with screw driver, you will have fits! I went and got a self tap screw and just run into the top of this box, sucked this was not at the top as I tried for hr to get it per stock and about blow a brain cell trying to make it happen!Now its up and running and making allot of mistakes on install it runs smooth, quiet and man the air flow in this little bathroom and my small house, I can feel with just one fan running for a few hrs everything has a cool feel to it, usually my house is humid as I live in the south and by water, so far very happy with the amount of air flow, can’t wait to put the next one in, get my attic insulation done, should make a huge difference in heating/cooling and overall air flow for my home.Thanks
Trustpilot
2 weeks ago
3 weeks ago